The Neat-Edges Trap: When Tidying a Prototype Hides Its Weak Spot
Learn why tidying a prototype too soon can hide weak joints or awkward movement, and how to test its basic shape before adding a finish.
The most common mistake with a rough prototype is tidying it before checking whether it works. With a paper mechanism or a small cardboard model, neat edges can hide a slipping joint, a pinched hinge or a shape that will not sit square; prototype testing keeps those faults visible while they are still easy to change.
Why can tidying a prototype hide a weak spot?
Finishing changes more than appearance. A strip of decorative paper can stiffen one face, tape can bridge a loose connection, and a folded-over edge can cover the place where a panel is starting to buckle. The object may feel more solid, yet the original problem has become harder to see.
That matters because a prototype is a model for asking questions, not a miniature finished product. Its roughness can reveal where pressure travels, which parts rub, and where a join begins to give way. Once layers of finish conceal those clues, a disappointing result is harder to diagnose: was the shape wrong, or did the covering alter it?
Leave the parts that affect movement or support exposed until you have checked them. A visible crease or a small gap can be more informative than a smooth surface.
What should you test before adding a finish?
Start with the prototype’s intended job. Decide what it must do in observable terms: stand upright, open without snagging, direct a bead along a path, or hold a flap at a chosen angle. A clear test helps separate a functional problem from an aesthetic preference.
Check the basic shape before judging the details. Look for a base that rocks, a panel that leans, a fold that lands off-centre, or a moving part that catches against its neighbour. Then try the same movement again, watching the contact points rather than simply asking whether the whole object feels right.
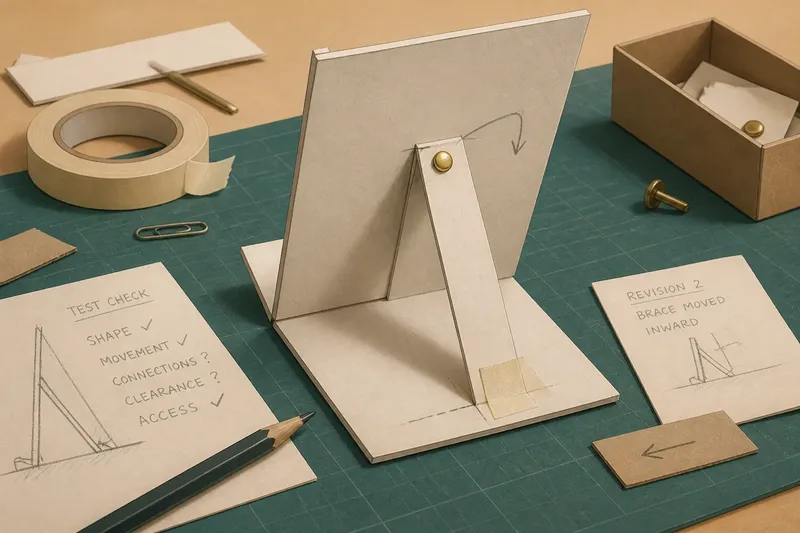
- Shape: Does the prototype sit or align as intended?
- Movement: Can each moving part travel through its needed path without snagging?
- Connections: Do tabs, folds or temporary tape stay in place during ordinary handling?
- Clearance: Is there room for neighbouring parts to pass without rubbing?
- Access: Can you still see and reach the joint or fold that may need adjustment?
Keep the first check simple. Change one feature at a time, then repeat the same movement so you can tell whether that particular change helped.
How can you test a prototype without making it look finished?
Use temporary materials that let you revise the shape. Scrap card, paper clips, removable masking tape and a pencil mark can hold an idea together without hiding every seam. For a moving paper part, a loose paper fastener can help you assess its path before you settle on a more permanent joint.
Temporary does not mean careless. Mark the front, the direction of movement, or the position of a part with a small pencil line. If you need to take the prototype apart, those marks can help you put it back in the same arrangement and compare the result fairly.
Imagine you are making a small paper stand whose rear brace keeps slipping. Before decorating it, you might mark the brace’s current position, move its lower end a little, and check whether the stand stays upright when its top is gently tapped. If the brace now holds but the stand twists, that visible twist points to a different weakness; a smooth covering would have made the cause less obvious.
Use ordinary handling rather than force. The aim is to learn how the object behaves during its intended use, not to see how much strain it can endure.
When is a prototype ready for neat edges?
A prototype is ready for finishing when its basic shape and movement behave consistently enough for the next decision. That does not mean every detail must be solved. It means you can identify what the finish is meant to improve, and can tell whether adding it changes the parts that matter.
Before covering a joint, note how it currently sits and moves. Then apply a small sample of the intended finish to a less critical area, or make a separate test piece from similar material. Compare stiffness, thickness and clearance; a thin coating may be harmless on a broad panel but troublesome beside a close-fitting fold.
Choose a finish that serves the object’s purpose. A display model may benefit from clean edges, while a reusable mechanism may be easier to maintain if its hinges and attachment points remain visible. You can tidy the outside without concealing the working parts.
Where a finish, adhesive or material choice depends on a product label, manufacturer instructions or local rules, follow that guidance.
How do you avoid polishing every revision?
Separate the prototype into working areas and presentation areas. Working areas include folds, pivots, braces, slots and joints; presentation areas are surfaces that do not affect the action. Keep the first group accessible while you adjust the second only as much as needed to judge the overall form.
Make revisions easy to identify. A pencil arrow, a different-coloured scrap tab, or a brief note such as “brace moved inward” can show what changed. Avoid rebuilding the entire object after each small discovery, since that can erase useful comparisons and encourage you to spend time on appearance before the shape is settled.
When a revised part behaves better, keep the earlier version nearby if practical. Seeing both can clarify whether the improvement came from the changed fold, the new joint position or an accidental change elsewhere. This is especially useful when several small adjustments are tempting at once.
What do makers often ask about prototype finishing?
Should I trim rough edges before testing?
Trim only edges that interfere with the test or make the object awkward to handle. Leave edges near a weak joint or moving part visible, since they may show where the material is bending or rubbing.
Can tape be part of a prototype test?
Yes, if you use it to hold a temporary connection rather than disguise a problem. Apply it so the joint remains visible, and check whether the tape itself is preventing a part from moving as intended.
What if the rough prototype looks too messy to assess?
Make only the changes that improve visibility: label parts, clear away loose scraps, or redraw the outline on a fresh sheet. Keep the mechanism and its connections accessible so tidiness does not replace the test.
How can I tell whether a finish has changed the movement?
Repeat the same simple movement before and after finishing, watching the same contact points. If the part catches, sits differently or needs more effort, inspect the added layer’s thickness or stiffness before changing the underlying shape.
How should you decide what to finish next?
Use prototype testing to settle the main shape and movement before adding a finish, then treat the finish as another design change rather than a harmless final touch. Check whether it covers a useful clue, stiffens a flexible area or narrows the space a moving part needs.
A neat edge can make a model easier to read, handle or display. Keep the roughness that still tells you something, and polish only when you can see what the polish is likely to change.