Choosing Cardboard, Paperboard or Corrugated Sheet for a Freestanding Model
Choose cardboard, paperboard or corrugated sheet for a freestanding model by matching each part to its shape, cut quality and visible edges.
The common mistake when choosing cardboard, paperboard or corrugated sheet for a freestanding model is reaching for the thickest sheet on hand. Thick material can leave bulky edges, awkward cuts or a model that tips despite its substantial-looking walls. Start with the model’s shape, then decide what each part and its edges need to do.
What will the model need to withstand?
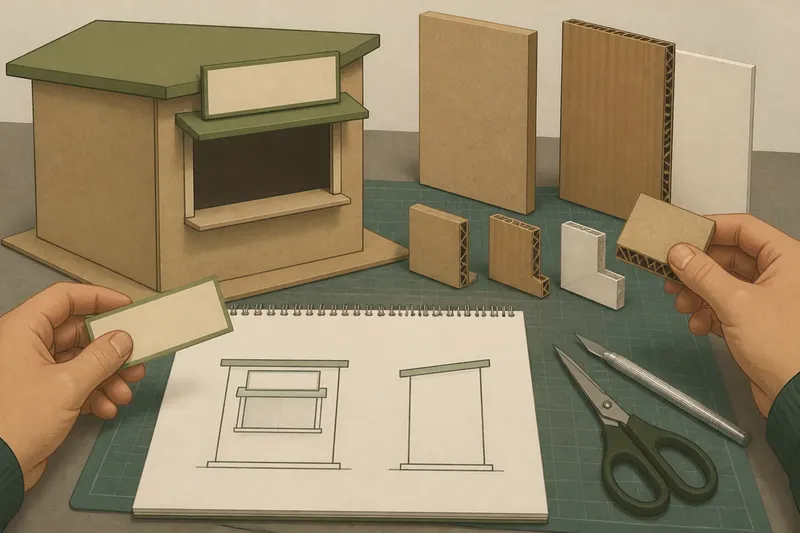
Sketch the model from the front and side. A small house, sign or display kiosk may have broad walls and a simple base; a model with narrow supports or projecting details asks more of its sheet material.
Consider how the model will be viewed and handled. Something that will sit untouched on a shelf can use delicate details, while a piece that may be moved benefits from parts that are easier to hold and edges that resist crushing.
Mark the broad panels, narrow pieces, folds and visible edges on the sketch. This lets you compare materials against their actual jobs rather than judging a sheet by thickness alone.
How do the three sheet materials differ?
Paperboard is a dense, fairly smooth sheet, such as the card used for a cereal box. It cuts cleanly with scissors or a craft knife and makes slim, tidy edges. It suits small panels and details, though a large unsupported wall can bend or buckle.
Cardboard can mean different things in everyday use. Here, it means solid, thicker board rather than a fluted sheet. It offers a substantial exposed edge and can suit broad model parts, but thick stock takes more effort to cut and may leave a blunt edge. Allow for that edge in the design.
Corrugated sheet has a wavy inner layer between flatter outer liners. Its flutes make it thicker without making it solid throughout, and a cut edge reveals the channels. It can suit larger, simple forms, but the open edge may look untidy and narrow pieces can be harder to cut accurately.
Packaging labels are not always precise about these terms. Inspect the sheet’s edge: a visible wavy layer identifies corrugation, while a solid, dense cross-section points to paperboard or solid board.
Which material suits each part?
Match the sheet to the part rather than forcing the whole model into one material. Smooth paperboard is often easier for small windows, signs and narrow trim; solid board can make a substantial base or wall; corrugated sheet can work for broad, plain panels when its thicker profile suits the look.
Check every edge that will remain visible. A clean paperboard edge may need little disguising, while corrugated sheet exposes its flutes. Turn an exposed edge away from the viewer, cover it with a separate strip or make the channels part of the design.
Before laying out parts, check the direction of the corrugation. Cutting across the channels and cutting along them reveal different edge patterns. Place the sheet against your sketch and choose the orientation that gives the visible sides the finish you want.
How can you compare cutting before committing?
Use a small offcut from each candidate sheet. Mark a straight line and a simple corner or opening, then cut them with the tool you expect to use. Check whether the cut stays controlled, the corners crush and the edge looks acceptable without extra covering.
Scissors may be enough for uncomplicated shapes in thin paperboard; a craft knife and cutting mat can help with straight openings and corners. Thicker solid board may resist scissors, while a rushed blade cut can compress corrugated sheet. Keep fingers clear of the blade and use the tool as intended.
Say you are making a small kiosk with a flat roof, a broad front and a narrow sign. Your starting materials are an offcut of paperboard for the sign and candidate sheets of solid board and corrugated sheet for the walls; the tools are scissors, a craft knife and a cutting mat. First, cut the sign outline from paperboard with scissors and check that its edge is clean. Next, cut a matching corner from each wall candidate on the mat, using the craft knife carefully; the corrugated offcut shows open channels, while the solid board gives a dense, fuller edge. If you want a tidy, slim sign and a solid-looking wall edge, use paperboard for the sign and solid board for the walls; if the corrugated edge suits the kiosk’s appearance, that sheet remains an option for the broad panels.
Which questions help settle the choice?
Is thicker sheet always stronger for a model?
No. Thickness alone does not tell you how a sheet will behave: corrugated sheet has hollow channels, while solid board is dense. Compare a sample shaped like the intended part and consider its size, form and visible edges.
Can I use different materials in one model?
Yes, if the parts meet neatly and the joins suit the materials. A paperboard detail can sit on a broader board panel, for instance; check whether the seam will be conspicuous and adjust the overlap or cover strip if needed.
What should I choose for clean visible edges?
Paperboard often gives a slim, smooth-looking cut edge, while corrugated sheet shows its flutes. Solid board has a fuller edge, so cut an offcut if that appearance matters to the finished model.
How do I know if a piece is too large for the sheet?
Hold a cut-out as it will sit in the model and see whether it bends or wobbles. If it does, change the shape, add a separate support or choose a more suitable sheet for that part.
What should you check before choosing?
Put the sketch beside the candidate sheets and compare the intended parts one by one. For each check below, follow the decision that matches what you observe.
- Check the cut edge for a wavy inner layer; if you see flutes, treat the sheet as corrugated and plan how to finish or display its edge, otherwise assess it as solid board or paperboard.
- Check whether the sheet’s thickness leaves enough room for your narrowest detail; if the detail looks too bulky on a trial piece, use thinner paperboard for it, otherwise keep the candidate under consideration.
- Cut a representative corner and opening from an offcut; if the edge tears or crushes, try a different tool or material, otherwise proceed to a larger trial piece.
- Check which edges will face the viewer; if a visible edge looks untidy, turn it away, cover it with a strip or choose a cleaner-edged sheet, otherwise leave it exposed.
- Hold a trial broad panel in its intended position; if it bends or wobbles, alter its shape, add a support or choose another sheet, otherwise keep it for that panel.
- Check where different materials will join; if the seam stands out, adjust the overlap or add a cover strip, otherwise use the materials together.
Choosing cardboard, paperboard or corrugated sheet for a freestanding model is easier when each piece has a clear job. Keep the offcuts from your trial cuts beside the sketch: they show the edge finish and help you make the same material choice when you later add a matching panel or detail.